|
Though this climb may not be a Sisyphean challenge, for the non-slab climber, it's somewhat close. Luckily the crux 8ish feet is well bolted and if necessary, the climb becomes a 5.10c A0 route with a couple french-free moves. Since I am weak at slab, I was thankful for the A0 opportunity, being already 5 pitches up. However, if you want to give the climb a go and you find you are not "feeling" pitch 2, rappel after completing pitch 3 (you'll have to climb the easy terrain found on pitch 4 to get to a rappel anchor). Pitch 5, 6, and 7 are very similar to pitch 2, all of them being slabby, but pitch 3 and pitch 9 break up the slabby climbing, along with a couple other scrambling "pitches" strewn about the climb.
Now on with the description:
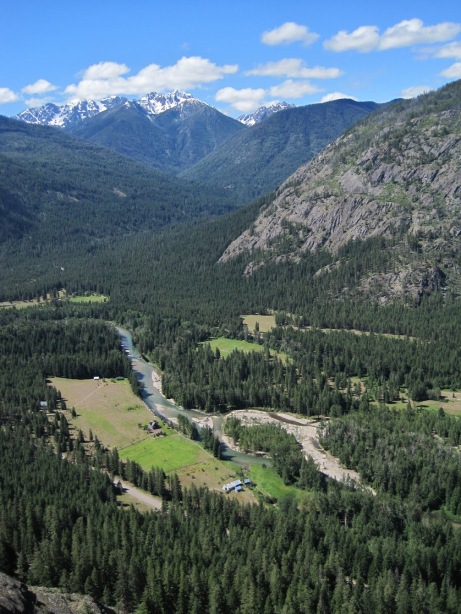
From Mazama, drive 2.7 miles from the Mazama store and park at a pullout on the left. If you can easily see the river and there is a trail to it, most likely you went 0.3 miles too far to the Prime Rib pullout. Find a trail across the road from the end of the parking lot closest to the Mazama store. Though the approach isn't very far, we wished we would have brought trekking poles for the scree, talus, and slippery trail descent.
Head up the trail, trending left when out of the trees if you lose it. You'll notice a single lone pine tree near the cliff band Lone tree and Sisyphus. Continue left around the rock outcropping and continue on more scree to where it meet the cliff. A fixed rope can be found on climber's right that can be used on the final 4th class approach to the start of the climb. If you haven't already, gear up here.
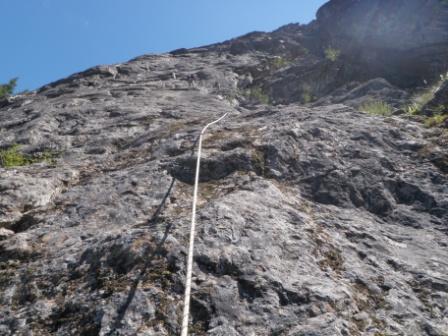
The topo of the route is highly useful and accurate, especially for rappelling and can be found here:TOPO. This climb is fully bolted, so leave your pro in the car.
- 5.7, 100ft. Climb the 5.7 corner/chimney system.
- 5.9. 100ft. Climb 5.9 slab to a nice belay ledge. If you hate this pitch, you probably won't like pitches 5-7, which includes the two hardest pitches, however keep on climbing pitch 3. You can regain the rappel line after completing pitch 4.
- 5.10a/b 150ft. Climb across the rubble filled gully, and access the easy ramp on the face. Follow this to the first bolt. A fall before this bolt would make for a very BAD outing. Enjoy the exposure on this interesting and enjoyable slighly arching pitch.

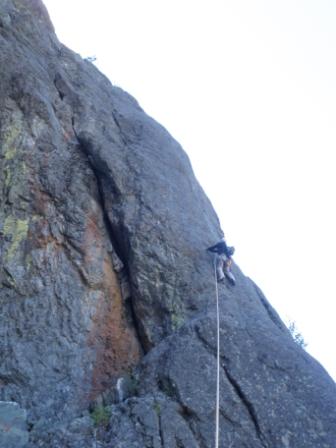
Pitch 3 heads up the skyline shown above
- 5.2 140ft. Scramble up the easy terrain, being careful not to knock any rocks down
- 5.8 120ft. Head up the easy 5.5 beginning section that brings you to ~60 ft of slabby 5.8 climbing, getting more slabby the closer you get to the anchor. Make the "step of faith" (again, I'm not a slab climber)to the semi-hanging anchor (this is the worst anchor on this climb, but not a truly hanging belay).
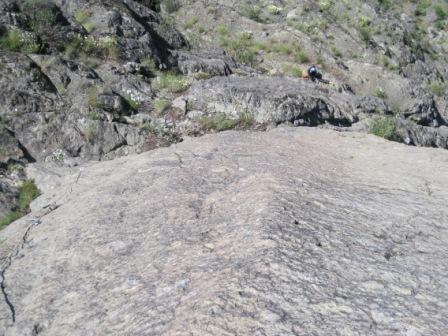
Pitch 5 Pitch 5 from above
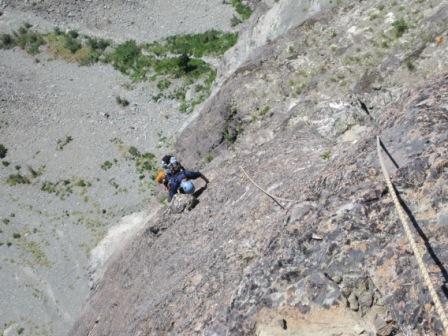
- 5.11a 80ft. This is the crux pitch with no easing into the harder moves. Make your way up, making use of side pulls and under clings. As you approach the cool looking polished rock (maybe from snow??) interspersed with pockets, look for good handholds and footholds as they will be necessary to pass the arching crux. Finish up the remainder 5.10c climbing after the crux and enjoy the break at the anchor with very small foot ledge to belay off of (this was much more comfortable than the previous belay).
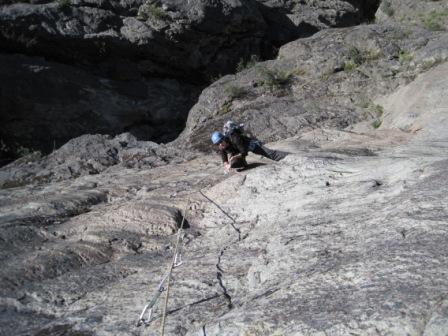
Pitch 6 from above, she is at the crux Enjoy the awesome view
- 5.10a/b 160ft. This pitch was a bit of a blur, but I remember making a tricky mantle, climbing some more 5.10 slabish climbing where eventually the climbing eases. The anchor is immediately to the left of the last bolt just below the large, easy ledges. Do not skip this anchor as it is placed so that to significantly reduce the chance of knocking rocks down from the large, easy ledge system (somehow I missed this and combined pitches 7 and 8. Since we couldn't hear each other and I started to get excessive rope drag, my partner and I are still not sure if we simul-climbed a short section here).
- 3rd class ledges 80ft. Meander up the 3rd class ledges, trending right.
- 5.9 100ft. Climb the steep, yet surprisingly positive "roof"/stemming problem. I really enjoyed this climb, but found I was a little tired.
- 5.6 100ft. Climb the easy slab route, heading straight up past the first couple bolts. The climbing on the arete found on climber's left was enjoyable and positive. Finish up the route on the nice belay platform.
Pitch 10 from above The descent consists of 12 rappels or 10 rappels and some downclimbing/scrambling on the two easy ledge systems. Most, if not all of the rappels, had little chance of snagging the rope and went rather quickly. After reaching the bottom of pitch 1, retrace your steps back to the bottom of the fixed rope.
I found this climb to be well protected where you needed it (even more so than Prime Rib, a much easier sister route to this one) and to be well thought out when set up so that it minimized much of the potential for rock fall from the loose ledges that apparently are somewhat common on Goat Rock, however it is highly recommended that you bring a helmet.
I highly enjoyed pitches 3 and 9 of this route, however if I were to climb it again, I would improve my skills at climbing 5.10+ slab to make pitches 6 and 7 more enjoyable. The crux was well bolted so that you can try it with little consequences, but you still need to be able to climb 5.10b/c slab.
Pitches 1 and 2, pitches 5 and 6, and pitches 9 and 10 can be linked.
Gear: bring a 60 m rope, helmets, and 12 - 16 draws, tending on the higher side if linking pitches. All anchors are 2 bolts.
|

|